Health And House Hold Vergali Fabric Booty Bands for Women Butt and Legs. Set of 4 Non Slip Cloth Resistance Working Out Band for Glute, Thigh, Squat with Workout Resistant Fitness Training Guide to Exercise at Home or Gym
About this item
latex
Perfect booty workout; get ready to strengthen your hip, thighs, and butt; these booty bands will give you the ultimate lower body workout that you have been looking for; just after a few sets of squats, lunges, and fire hydrants, you will be feeling the burn in no time; soon you will be turning your living room into a quarantine gym
Better comfort, better grip; stop using those latex rubber bands that pinch your skin; our bands are made with high quality fabric which makes your workouts way more comfortable; with non-slip elastic grips on the inside, you can now workout with bands that stay in place; no more worrying about your bands slipping, sliding, or rolling down your legs; wear them with tights or bare skin and avoid the hassle of having to readjust in the middle of a set
Exclusive training guide and workout videos included; access our training guide and working out videos online so you can get the proper technique for each leg and booty exercise; our training guide is easy to follow for any beginner and will enhance your workouts throughout the week so you will see immediate results
Four resistance strengths; we offer four exercise bands, each with different resistance levels and tensile strengths; build up your strength one band at a time starting with our light and medium bands, and work your way up to our more advanced heavy and heroic bands; each band is the same size and thickness so you can continue the same exercises as you progress through each strength
Lifetime manufacturer’s warrant; we are so confident that you will love our booty bands that we are offering all customers a lifetime manufacturer’s warranty. Our customer support team is here to help
GalSports Exercise Ball (45cm-75cm), Yoga Ball Chair with Quick Pump, Stability Fitness Ball for Core Strength
About this item
🎄 BURST RESISTANT & SAFE DEFLATION - Our exercise ball is safety guaranteed with the honey comb structure, so even if you accidentally pierce the yoga ball, you will never fall to the ground immediately. This structure means the air would be released little by little, therefore, this anti-burst and slow deflation design makes the stability ball so much safer.
⛄ Anti Slip Material- The non-slip lines offer this equipment more friction, which means you can not only practice at home or in the gym, but also in places like outdoors or open spaces where the ground conditions are tougher. And rather than invest in a large, expensive gym machine, going for a smaller and more economical option like the fitness ball is much wiser! Use it to enhance your flexibility, facilitate your stretching, and maintain the stability during your practice of Yoga or Pilates!
🎁 Excellent Quality Material & Weight Capacity - Amazingly high weight capacity of 2,000 lbs. Professional GYM grade PVC: harmless to humans and pets alike, safely certified by SGS, BPA-free, latex-free and durable. Whether used as a pregnancy ball, a physio ball, a fun bouncy ball for your kids, or a professional ball for physical therapy, it would never fail you! Enjoy the soft and comfortably elastic texture as you press it down.
🎈 Sitting Posture Correction& Massage: This inflatable balance ball can be effectively served as a multifunctional Office Ball Chair. It constantly reminds you of a good sitting posture as your various body parts actively make subtle adjustments to stay in balance, which makes you automatically sit up nice and straight, increasing overall blood circulation. The soft PVC surface produces a massaging effect to alleviate your fatigue while working in front of the desk.
🎅 EASY TO INFLATE – Conveniently inflatable, comes with a quick inflation foot pump, a plug remover, a measuring tape, 2 air stoppers, and detailed instructions. Available in 4 sizes: 45cm, 55cm, 65cm, and 75cm to cater to your specific needs. Make the purchase decision based on your individual height. Also make sure you can comfortably hold the gym ball of the size chosen with your hands and squeeze it in between your feet conveniently if these moves will be often practiced.
Health and House Hold,Touchless Forehead Thermometer for Adults and Kids, Digital Infrared Thermometer for Home with Fever Indicator, Instant Accurate Reading
Touchless thermometer for adults, kids and the elderly!
femometer infrared forehead thermometer is specifically designed for easily use on the forehead.
femometer forehead thermometer is intended for the intermittent measurement of human body temperature from the forehead by people of all ages. When properly used, it will quickly assess your temperature in an accurate manner.
It has forehead mode and object Mode.You can also use object mode to measure the temperature of a room or object.
It will be a great edition to your home medicine chest!
Features & details
Essential item for fever monitoring: Femometer infrared thermometer is a ideal for adults, kids and elders. It's accuracy and easy to use, which is a great gift for yourself or someone you care about.
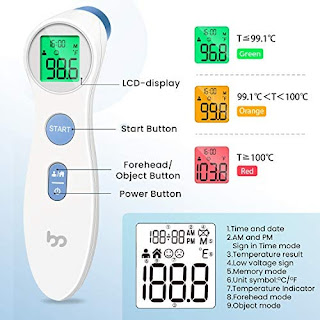
No Contact Thermometer: The infrared thermometer will get the temperature reading without body or object contact. Move the thermometer close to the forehead and press the button, you will get the accurate temperature readings.
Fever Alarm: There are 3 colors display on the LCD screen for different temperature level. With clear large LCD Screen Display, it allows you easy to read day and night. ℉ and ℃ are easily switchable.
Dual mode:The infrared thermometer can measure both human body temperature and object temperature. It can record 10 sets of data.
What You Get:1 Infrared Thermometer, 1 Operating Manual,1 Quick Start Guide, 2 AAA batteries(LR03)
Both phorias and tropias can be accurately measured using prism and cover tests. Initially a cover test is performed to determine the fixing eye and estimate the deviation. This is followed by the prism and alternating cover test, with adjustment of prism strength until refixation movement of the eyes is neutralized.
Phorias
Although most normal individuals have at least some phoria, the vast majority are asymptomatic. If a deviation is uncovered on routine testing in an asymptomatic patient, no treatment is necessary. If a patient is complaining of asthenopia and a deviation is discovered during testing, one must first ensure that there are no coexisting issues prior to attributing the symptoms to a phoria. There are a number of causes for asthenopic symptoms that should be ruled out. Some of these causes are summarized in Table 1. To be sure, some of the refractive causes of asthenopia are via induced phorias.
Once other causes for symptoms are ruled out, phorias should be investigated, and, in certain cases, may benefit from partial prism correction. One indication that the patient will benefit from prisms is minimal prism adaptation during a 15- to 20-minute trial with prisms in the waiting area. Otherwise, if there is a significant adaptation to the prisms, the patient’s symptoms will probably not be improved through the use of prisms, and other therapies, including surgery, should be considered.
Esophoria
As soon as the cover/uncover test identifies an esophoria, the next step is to obtain an accurate cycloplegic refraction because many cases of esophoria are “accommodative,” due to uncorrected or undercorrected hyperopia. It is wise to perform the cover/uncover test for esophoria at both distance and near, for the deviation may be larger at one distance than the other.
After refracting the patient and ensuring that there is no uncorrected hyperopia, one may wish to try a small amount of plus sphere to decrease the accommodative demand, as some cases of esophoria are due to accommodative excess. Such intervention is often enough to treat the condition, but base-out prism may be necessary if refractive methods fail. In situations that require the use of prisms, base-out prism should be prescribed with only the minimum amount of power required to eliminate the symptoms.
Exophoria
Again, careful refraction of the patient can help the management of many cases of exophoria. With refractive correction in place, if any, cover tests should be performed, and accommodation should be evaluated by push-up measurement of accommodative amplitude, or, especially in children, by dynamic retinoscopy. Divergence excess (in contrast to convergence insufficiency) manifests as an increased angle of exophoria in the distance.
In exophoria, correcting both myopia and hyperopia can help improve symptoms, but additional cautions should be taken when correcting hyperopia, as full correction of hyperopia may worsen the symptoms. A several-minute test with hyperopic correction should be attempted to see if exophoric symptoms improve because of clearer imagery or worsen by relaxing accommodation. If they worsen, prescribe the largest correction possible to treat the hyperopia while avoiding exophoric symptoms. A good starting point is one-third of the spherical error. Just as plus lenses can be helpful for esophoria, decreased-power plus lenses or even minus lenses can improve exophoria.
Base-in prisms may also be helpful for the treatment of exophoria. As with esophoria, the least amount of prism that eliminates exophoric symptoms should be used. The cover test should provide an estimate of the power of the prism to be used. Additionally, treating a minor hyperphoria with vertical prisms can allow the patient to compensate for exophoria with no need for horizontal prisms (see below). If divergence excess is found to be the cause of the exophoria, prisms should be avoided. In this situation, base-in prism can cause esophoria at near, which patients do not tolerate well.
Hyperphoria
Both the measurement and treatment for hyperphoria are similar to those for the horizontal heterophorias. One important point regarding hyperphorias is that they often coexist with horizontal heterophorias, and the treatment of one may improve or eliminate the other condition. Therefore if either a horizontal heterophoria or a vertical heterophoria is found, it is important to investigate whether the other is present. Initial attempts at treatment should be focused on the primary phoria with the intention of treating both.
Tropias various types of tropias can be categorized in a number of ways. Broadly, they can be considered as comitant or incomitant. Surgery is generally the preferred treatment for tropias unless there is a reason not to perform surgery (see above). Therefore prisms for tropias are generally used as a temporizing measure until surgery can be performed.
In general, the measurement and treatment of tropias parallel those of phorias, as discussed above. A 30- to 45-minute patch test can be especially useful in uncovering the full deviation. When measuring
incomitant deviations with prisms with each eye “fixing,” it is imperative to switch the prism to always be before the non-fixing eye. Otherwise the “fixing” eye behind the prism will not truly be looking in the intended direction, and major measurement errors can occur. For comitant strabismus, a prism adaptation test can be helpful to help determine treatment. For incomitant strabismus, prisms may be helpful to move an area of single vision to straight ahead.
Anisometropia
Often when patients with anisometropia receive a new pair of glasses, they will complain of double vision, particularly while reading. This double vision is due to the differential prismatic effects of the two lenses when the patient is looking off-center as when reading (as per Prentice’s Rule). In order to improve reading vision, vertical prism can be incorporated into the lower portion of one lens or the other to help compensate for the differential vertical prismatic effect and lessen or eliminate the double vision. These prisms are referred to as slab-off or reverse-slab prisms. The slab-off prism is placed on the more minus or less plus lens, more commonly on glass lenses, and in effect takes away base-down prism (adds base-up prism). The reverse-slab prism is placed on the more plus or less minus lens, most commonly on molded plastic lenses, and adds base-down prism.
Rather than a calculation of the amount of slab-off or reverse-slab prism to prescribe, trial-and-error measurements are preferred because one does not know how much the patient has already compensated to previous anisometropic glasses. Increasing the amount of prism handheld over the lower portion of one lens of the anisometropic correction until the patient can read comfortably is the most reliable way to determine the amount of slab-off or reverse-slab prism to prescribe. Up to 4∆ to 6∆ of slab-off or reverse-slab effect can be obtained when needed.
Pitfalls in Measuring Deviations
When prisms are used to measure a strabismic deviation in a patient, several easily avoidable mistakes are commonly made.
Positioning
The position in which the prism is held can be critical when measuring a patient’s deviation. There are three intended positions for holding prisms: the Prentice position, the minimum deviation position, and the frontal plane position . Glass prisms are calibrated for the Prentice position and should be held in this manner when making measurements. Plastic prisms, including plastic prism bars, are generally calibrated for the minimum deviation position. As it is difficult to estimate accurately the minimum deviation position, the frontal plane position is a good approximation when using plastic prisms.
Adding Prisms
Stacking two prisms in the same direction, especially if one is of high power, can also lead to errors because of the same positioning issues mentioned above. If the two prisms are held in contact with each other, even if the first prism is held in the correct position, the second prism will not be in the correct position in relation to the light leaving the first prism. This will create a stronger prism effect than the sum of the two prisms, leading to a falsely low measurement. If the sum of the two prisms is prescribed, or surgery is based on the prism measurement, the patient will be left undercorrected. It is difficult to estimate accurately the correct position of the second prism in relation to the first, and it is therefore more accurate to simply stack the prisms together and use a conversion table to add their true effects.
Splitting Prisms Between the Eyes
One might assume that one way to avoid the difficulties of stacking two prisms is to split the prisms between the two eyes and add the powers together. Although this may work for low prism powers, it becomes increasingly inaccurate with increasing prism power. Splitting prisms is preferred over stacking two prisms together in the same direction before one eye, but again using a table of summed prism values is preferred to avoid errors.
Method for Calculating Oblique Prism
There is a simple method to calculate oblique prism from combining a horizontal prism with a vertical prism that does not require trigonometric calculations and requires only a piece of paper, a ruler, a pen or pencil, and the protractor on a phoropter or trial frame.
First, sketch the vector addition of the two prism powers on polar coordinates to determine the approximate angle for the base direction of the oblique prism. Up is base-up, and right is base-in or base-out depending on which eye the prism is intended for.
Then measure off the number of prism diopters of the two component prisms on two adjacent edges of a piece of paper. (One can use any unit for this measurement, but the unit must be consistent. For example, if you have two prisms, one of 3∆ and the second 2∆, measure off 3 cm/inches/etc on one edge and 2 cm/inches/etc on the other edge). Connect the two measurement marks with a line, forming a triangle. Now measure the length of the connecting line you just drew, the hypotenuse of the triangle. This will give you the number of prism diopters for your oblique prism.
Then fold the paper along the hypotenuse, identify the acute angle of the triangle that you estimated using your polar coordinate plot, and measure this angle using the protractor on the phoropter or trial frame, giving you the base direction of the oblique prism.
Uncommon but Important Uses for Prisms Childhood Cranial Nerve Palsies (Third, Fourth, and Sixth Cranial Nerves)
For children with cranial nerve palsies, early treatment is important to prevent amblyopia. Prisms may be used for small, reasonably comitant deviations in order to maintain binocular function. A test with temporary plastic Fresnel prisms is recommended prior to grinding prisms into the child’s lenses. Treatment of a recognized underlying cause is essential, and if prism therapy fails, surgery should be considered.
Prisms for Enhancing Communication
For patients with no useful vision in the deviated eye, prisms can be extremely helpful in improving the appearance of the eyes and facilitating the patients’ communication and interaction with others by alleviating difficulties with eye contact. A prism held opposite the direction of a correcting prism can improve the apparent alignment of the eyes (ie, base-in for esotropia and base-out for exotropia). Expect approximately 1 mm of apparent eye shift for every 8∆ of prism power.
Homonymous hemianopia
Prisms (or mirrors) may be used in patients with homonymous hemianopia to bring images from an area within the visual field defect into the area with retained vision. Although this may be useful on occasion, generally very high prism powers are required, which can create cosmetic problems as well as a confusing visual environment in which objects may appear and disappear from view unexpectedly.
Hemispatial neglect
Patients who experience right hemisphere strokes often experience left hemispatial neglect. Recent studies have shown that yoked prisms which move both visual fields to the opposite side (to the right) improve function in these patients. The mechanism for this improvement is believed to be that in order to compensate for the shifted binocular visual field, the patient must remap his sensorimotor coordinates leftward, and this has been shown to improve function on the neglected left side.
Nystagmus with head turn
Patients with a head turn to compensate for nystagmus can benefit from yoked prisms, but just as with patients with homonymous hemianopia, they will often require very high prism powers which may lead to decrease in visual acuity (especially with Fresnel prisms), chromatic aberration, heavy lenses, and cosmetic problems, as well as the visual disturbances described above. In spite of these problems, prescription of bilateral yoked prisms, with base in the same direction as the head turn, can keep the patient’s eyes in an eccentric null position while lessening the head turn.
The visual pathway so we're going to take how the light hits the retina and we're going to take it through the optic nerve and all the other different process if you guys have already watched our video on the phototransduction cascade that's going to be very very important that you do that before we get into this visual pathway because we already talked about exactly how those light rates got converted into chemical changes and then electrical changes and how they went down the axon to the ganglion cells which basically made up the optic nerve all right so now we're going to have two eyeballs right
this is the we're going to say this the left eyeball and this is the right eyeball okay now first things first what I want us to try to imagine if we're gonna put a lot of different concepts together when you guys are looking you guys are like looking at anything around you we our eyes are so amazing that they can pick up different types of visual fields so for example this is the right visual field or the right visual field and this is the left eyes visual field okay so what is this one right here this is the right eyes visual field and this one over here is the left eyes visual field okay now with in the visual field you have two different components of this visual field we're going to say this is the nasal so since your you'd have your honker right there pretend this is your nose okay so pretend this structure here is your nose okay since this is the nose these two structures that are near the nasal region this is the nasal component of the visual field alright so this is the nasal component of the visual field and then this one over here would be near the temple so this is the temporal component of the visual field and this over here is going to be the temporal component of the visual field okay now to make it easy though now that we know that this is what it is it's nasal and the temporals these words are going to get interchanged a lot so I do not want to confuse you guys so what I'm going to do is for the sake of it is I'm going to switch nasal and since this is the right visual field this is what gets confusing the right visual field has a left visual field and a right visual field okay so the right eye has a left visual field and a right visual field so we're going to say this is the left visual field and this is the right visual field okay so I just want to make it as simple as I possibly can here this whole right eye is going to have two fields it's going to have the right visual field and last visual field same thing this left eye is going to have two visual fields it's going to have a left visual field and a right visual field okay simple as that now we're going to be able to kind of do this a lot easier now so instead of using the words nasal and tempore but understand those words because it's going to be important lesions okay let's say first off when we're looking out let's say that this part of the retina there's two parts of the retina so this is the right eye this part of the retina is closest to the Temple or the right temple right so we're going to call this part of the retina we're going to call this the temporal Hemi retina okay that's a temporal Hemi retina now here's what gets really funky the temporal Hemi retina is receiving light rays from the left visual field okay so from here this part here this left visual field is hitting this part of the retina okay so if light rays from the left visual field are hitting this part of the hit retina that temporal heavy right now but then the what is this one this one is close to the actual nose so since it's close to the nose this is called the nasal right Hemi retina so it's called the nasal hemorrhage now and it's called the temporal Hemi retina the nasal hemorrhage now is receiving light from the right visual field so the nasal Henry retina is getting hit with light from the right visual field .
The retina which is the deepest layer of the eye remember that we have a fibrous tunic which consists of the sclera and cornea then we have the vascular tunic which contains the choroid and then the neural tunic which has a lot of neurons as you can see and that really is just the retina and we'll go to this image real quick just for a minute but when light enters your eye it's gonna go through the pupil obviously and it's gonna go through to the back of the eye and here's the retina and so in doing so in following that path the light's gonna have to pass through the cornea the anterior chamber the posterior chamber the lens and then through the vitreous chamber and then finally that light is gonna strike the retina at the back of the eye in which you can see a little bit more macroscopically in this picture right here and within the retina we have three cell types the first type is called the photoreceptor cells or just photoreceptors and these are the cells that initially detect the light and there are two subtypes of photoreceptor cells and those are rods and cones we're gonna have a separate video where we go over the major differences between these but I'll just say this for now rods detect non colored light so non color vision just bright and dark and cones detect color okay see four cones see four color then we also have bipolar cells and then we have ganglion cells which eventually become continuous with the optic nerve these are the three major cell types there's also a couple other cell types called amacrine cells and horizontal cells and we're not going to get into these very much most Anatomy courses don't but they just exist pretty much to find tune and regulate the functions of these cell types particularly bipolar cells and ganglion cells okay now before we go any further I want you to notice something so we've got light that we mentioned was passing through the eye okay like this in this direction and then it strikes the retina but what's interesting about the setup of this is it actually doesn't encounter the photoreceptors first actually if we follow the passage of light the photoreceptors are at the back of the eye they're there actually we could say superficial to the ganglion cells so actually the light has to travel through the ganglion cells and then through the


 various types of tropias can be categorized in a number of ways. Broadly, they can be considered as comitant or incomitant. Surgery is generally the preferred treatment for tropias unless there is a reason not to perform surgery (see above). Therefore prisms for tropias are generally used as a temporizing measure until surgery can be performed.


